
이것저것
04 상대 레이아웃, 테이블 레이아웃, 프레임 레이아웃, 스크롤 뷰 본문
상대 레이아웃으로 만들 수 있는 화면은 제약 레이아웃으로 대부분 구현 가능해서 많이 사용하지는 않지만 예전에 만든 레이아웃이 상대 레이아웃인 경우가 많기 때문에 소개하도록 하겠습니다.
상대 레이아웃은 부모 컨테이너나 다른 뷰와의 상대적 위치를 이용해 뷰의 위치를 결정할 수 있도록 합니다. 바로 코드와 결과 화면으로 확인하도록 하겠습니다.
<?xml version="1.0" encoding="utf-8"?>
<RelativeLayout xmlns:android="http://schemas.android.com/apk/res/android"
    xmlns:app="http://schemas.android.com/apk/res-auto"
    xmlns:tools="http://schemas.android.com/tools"
    android:layout_width="match_parent"
    android:layout_height="match_parent"
    tools:context=".MainActivity" >

    <Button
        android:id="@+id/button6"
        android:layout_width="match_parent"
        android:layout_height="match_parent"
        android:layout_alignParentStart="true"
        android:layout_alignParentLeft="true"
        android:layout_below="@+id/button8"
        android:background="#ff0088ff"
        android:text="asdf"
        android:layout_above="@id/button7"/>

    <Button
        android:id="@+id/button7"
        android:layout_width="match_parent"
        android:layout_height="wrap_content"
        android:layout_alignParentStart="true"
        android:layout_alignParentLeft="true"
        android:layout_alignParentBottom="true"
        android:text="Button" />

    <Button
        android:id="@+id/button8"
        android:layout_width="match_parent"
        android:layout_height="wrap_content"
        android:layout_alignParentStart="true"
        android:layout_alignParentLeft="true"
        android:layout_alignParentTop="true"
        android:text="Button" />
</RelativeLayout>
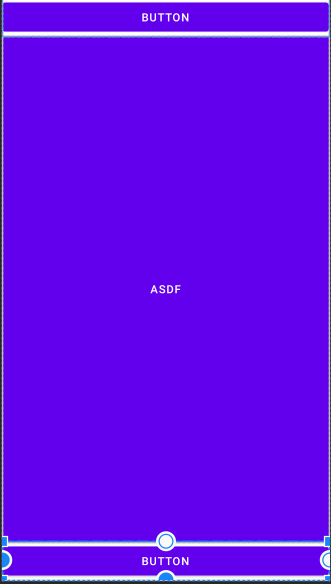
위 코드를 보시면 layout_alignParentTop, layout_alignParentStart 등의 속성이 있는데 이는 부모 레이아웃의 위쪽, 시작 부분에 붙이라는 뜻이 됩니다. 또한 layout_above라는 속성을 통해 해당 id를 가지는 view 위에 배치, layout_below라는 속성을 통해 해당 id를 가지는 뷰의 아래쪽에 배치할 수 있습니다.
테이블 레이아웃은 표나 엑셀 시트와 같은 형태로 화면을 구성하는 레이아웃입니다. 테이블 레이아웃 안에는 TableRow라는 행이 존재하고 그 안에 열들이 존재합니다.
<?xml version="1.0" encoding="utf-8"?>
<LinearLayout xmlns:android="http://schemas.android.com/apk/res/android"
    xmlns:app="http://schemas.android.com/apk/res-auto"
    xmlns:tools="http://schemas.android.com/tools"
    android:layout_width="match_parent"
    android:layout_height="match_parent"
    tools:context=".MainActivity" >

    <TableLayout
        android:layout_width="match_parent"
        android:layout_height="match_parent"
        android:stretchColumns="0,1,2">

        <TableRow
            android:layout_width="match_parent"
            android:layout_height="match_parent" >

            <Button
                android:id="@+id/button"
                android:layout_width="wrap_content"
                android:layout_height="wrap_content"
                android:text="Button" />

            <Button
                android:id="@+id/button2"
                android:layout_width="wrap_content"
                android:layout_height="wrap_content"
                android:text="Button" />

            <Button
                android:id="@+id/button4"
                android:layout_width="wrap_content"
                android:layout_height="wrap_content"
                android:text="Button" />

        </TableRow>

        <TableRow
            android:layout_width="match_parent"
            android:layout_height="match_parent" >

            <Button
                android:id="@+id/button5"
                android:layout_width="wrap_content"
                android:layout_height="wrap_content"
                android:text="Button" />

            <Button
                android:id="@+id/button6"
                android:layout_width="wrap_content"
                android:layout_height="wrap_content"
                android:text="Button" />

            <Button
                android:id="@+id/button7"
                android:layout_width="wrap_content"
                android:layout_height="wrap_content"
                android:text="Button" />
        </TableRow>

        <TableRow
            android:layout_width="match_parent"
            android:layout_height="match_parent" >

            <EditText
                android:id="@+id/editTextTextPersonName"
                android:layout_width="wrap_content"
                android:layout_height="wrap_content"
                android:ems="10"
                android:inputType="textPersonName"
                android:text="Name"
                android:layout_span="2"/>

            <Button
                android:id="@+id/button8"
                android:layout_width="wrap_content"
                android:layout_height="wrap_content"
                android:text="Button" />
        </TableRow>


    </TableLayout>
</LinearLayout>

위 코드를 보시면 TableLayout안에 TableRow가 존재하고, 그 안에 Button, EditText 등의 뷰들이 열을 이루고 있습니다.
이때 테이블 레이아웃에 설정할 수 있는 속성으로 shrinkColums, stretchColumns가 있는데 이 속성들은 각각 특정 열을 자동으로 축소하거나 확장할 수 있도록 만들어줍니다.
위 코드는 stretchColumns를 적용한 것으로, 테이블 행의 여유 공간을 남기지 않기 위해 각 열이 행을 균등한 공간으로 분할하여 같도록 하였습니다. 이때 android:stretchColumns="0,1,2"라고 되어있는데 0,1,2는 각 열의 인덱스 번호로, 여유 공간을 해당 인덱스의 열들이 나눠 같는다는 의미가 됩니다.
EditText 뷰를 보시면 혼자서 2개의 열 공간을 차지한 것을 볼 수 있는데 이때 사용한 속성이 layout_span입니다. 이 속성에 준 값의 개수만큼의 열을 차지하게 됩니다.
프레임 레이아웃에 뷰를 넣으면 그중에서 하나의 뷰만 화면에 표시합니다. 프레임 레이아웃에서는 뷰들이 중첩된 상태로 존재하고, 각각의 뷰들은 가시성(visibility)라는 속성을 갖습니다. 이때 속성 값으로는 visible, invisible, gone가 있습니다.
<?xml version="1.0" encoding="utf-8"?>
<LinearLayout xmlns:android="http://schemas.android.com/apk/res/android"
    xmlns:app="http://schemas.android.com/apk/res-auto"
    xmlns:tools="http://schemas.android.com/tools"
    android:layout_width="match_parent"
    android:layout_height="match_parent"
    tools:context=".MainActivity"
    android:orientation="vertical">

    <Button
        android:id="@+id/button"
        android:layout_width="wrap_content"
        android:layout_height="wrap_content"
        android:text="change"
        android:layout_gravity="center"
        android:onClick="onButton1Clicked" />

    <FrameLayout
        android:layout_width="match_parent"
        android:layout_height="match_parent"
        >
        <ImageView
            android:id="@+id/imageView"
            android:layout_width="wrap_content"
            android:layout_height="wrap_content"
            android:visibility="invisible"
            app:srcCompat="@drawable/dream01"
            />
        <ImageView
            android:id="@+id/imageView2"
            android:layout_width="wrap_content"
            android:layout_height="wrap_content"
            android:visibility="visible"
            app:srcCompat="@drawable/dream02"
        />

    </FrameLayout>
</LinearLayout>
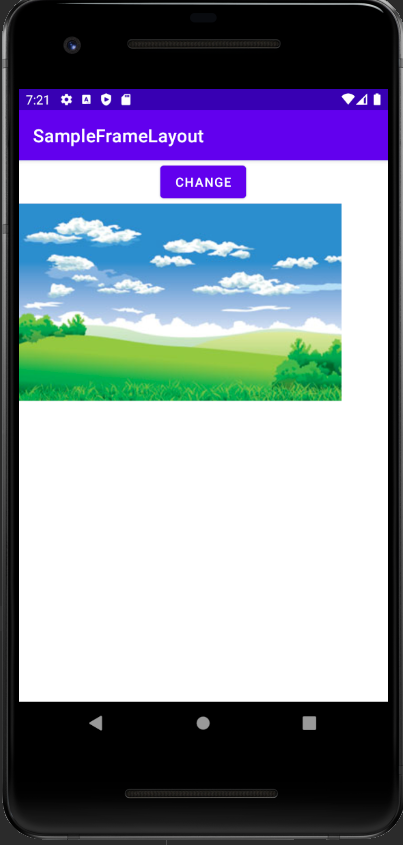
위 코드를 보시면 FrameLayout에 두 개의 image가 있습니다. 프레임 레이아웃의 성질로 인해 두번째 뷰만이 화면에 보이지만 각 뷰에 invisible, visible라는 visibility 값을 주었습니다.
현재 화면에 보이는 이미지는 하나이지만 버튼을 클릭하면 다른 이미지가 보이도록 다음과 같은 이벤트함수를 만들었습니다.
package org.techtown.sampleframelayout;

import androidx.appcompat.app.AppCompatActivity;

import android.os.Bundle;
import android.view.View;
import android.widget.ImageView;

public class MainActivity extends AppCompatActivity {

    ImageView imageView;
    ImageView imageView2;

    int imageIndex = 0;

    @Override
    protected void onCreate(Bundle savedInstanceState) {
        super.onCreate(savedInstanceState);
        setContentView(R.layout.activity_main);

        imageView = findViewById(R.id.imageView);
        imageView2 = findViewById(R.id.imageView2);
    }

    public void onButton1Clicked(View v){
        changeImage();
    }

    private void changeImage(){
        if(imageIndex==0){
            imageView.setVisibility(View.VISIBLE);
            imageView2.setVisibility(View.INVISIBLE);
            imageIndex = 1;
        }
        else if(imageIndex==1){
            imageView.setVisibility(View.INVISIBLE);
            imageView2.setVisibility(View.VISIBLE);
            imageIndex = 0;
        }
    }
}
위 코드를 간단히 설명하자면 우선 setContentView를 통해 자바 파일과 xml 파일이 서로 연결이 되었습니다. 그래서 imageView 뷰들을 findVewById라는 메서드를 통해 가져온 후, 버튼을 누르면 각 뷰들의 가시성 값들을 setVisibility메서드를 통해 바꿔줬습니다.
자바코드에서 id에 접근할때는 R.id.아이디 처럼 사용하면 됩니다.
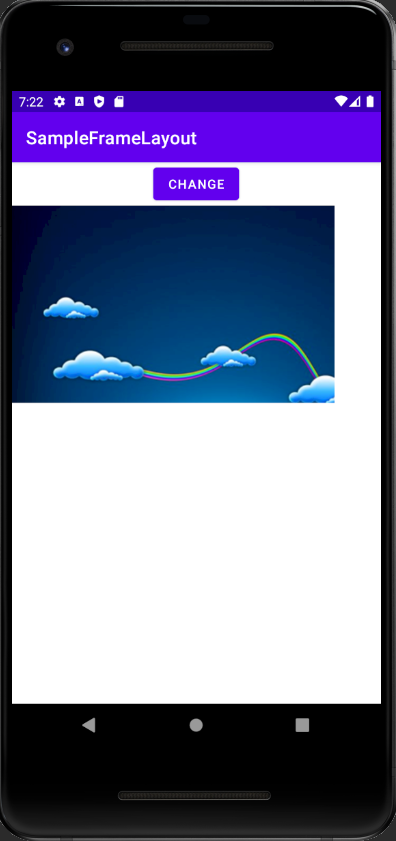
버튼을 누르면 다음과 같이 화면이 바뀌게됩니다.
마지막으로 스크롤뷰입니다.
스크롤뷰는 추가된 뷰의 영역이 한눈에 다 보이지 않을 때 스크롤뷰를 추가하고 그 안에 뷰를 넣으면 스크롤이 생기게됩니다. 스크롤뷰는 기본적으로 수직 방향의 스크롤을 지원하고, 수평방향의 스크롤을 사용하려면 HorizontalScrollview를 사용하면 됩니다. 앞선 레이아웃에서는 xml 코드에서 이미지 파일을 미리 가지고 왔지만 이번에는 다른 방식으로 이미지를 불러오도록 하겠습니다.
<?xml version="1.0" encoding="utf-8"?>
<LinearLayout xmlns:android="http://schemas.android.com/apk/res/android"
    xmlns:app="http://schemas.android.com/apk/res-auto"
    xmlns:tools="http://schemas.android.com/tools"
    android:layout_width="match_parent"
    android:layout_height="match_parent"
    tools:context=".MainActivity"
    android:orientation="vertical">

    <Button
        android:id="@+id/button"
        android:layout_width="wrap_content"
        android:layout_height="wrap_content"
        android:text="show changed image"
        android:layout_gravity="center_horizontal"
        android:onClick="onButton1Clicked" />
    <HorizontalScrollView
        android:id="@+id/horScrollView"
        android:layout_width="match_parent"
        android:layout_height="match_parent"
        >
        <ScrollView
            android:id="@+id/scrollView"
            android:layout_width="match_parent"
            android:layout_height="match_parent"
            >
            <ImageView
                android:id="@+id/imageView"
                android:layout_width="wrap_content"
                android:layout_height="wrap_content"
              />

        </ScrollView>
    </HorizontalScrollView>

</LinearLayout>
우선은 버튼을 누르면 이미지가 바뀌도록 위에 버튼을 하나 추가하고, 기본적으로 수평 방향의 스크롤이 되도록 한 상태에서 스크롤을 하나 더 추가하고 그안에 들어갈 이미지뷰를 추가합니다.
나머지 기능은 MainActivity.java에서 구현하였습니다.
package org.techtown.samplescrollview;

import androidx.appcompat.app.AppCompatActivity;

import android.content.res.Resources;
import android.graphics.drawable.BitmapDrawable;
import android.os.Bundle;
import android.view.View;
import android.widget.ImageView;
import android.widget.ScrollView;

public class MainActivity extends AppCompatActivity {
    ScrollView scrollView;
    ImageView imageView;
    BitmapDrawable bitmap;
    int count = 0;

    @Override
    protected void onCreate(Bundle savedInstanceState) {
        super.onCreate(savedInstanceState);
        setContentView(R.layout.activity_main);

        scrollView = findViewById(R.id.scrollView);
        imageView = findViewById(R.id.imageView);
        scrollView.setHorizontalScrollBarEnabled(true);

        Resources res = getResources();
        bitmap = (BitmapDrawable) res.getDrawable(R.drawable.image01);
        int bitmapWidth = bitmap.getIntrinsicWidth();
        int bitmapHeight = bitmap.getIntrinsicHeight();

        imageView.setImageDrawable(bitmap);
        imageView.getLayoutParams().width = bitmapWidth;
        imageView.getLayoutParams().height = bitmapHeight;
    }

    public void onButton1Clicked(View v){
        changeImage();
    }
    private void changeImage(){

        if(count==0) {
            Resources res = getResources();
            bitmap = (BitmapDrawable) res.getDrawable(R.drawable.image02);
            int bitmapWidth = bitmap.getIntrinsicWidth();
            int bitmapHeight = bitmap.getIntrinsicHeight();

            imageView.setImageDrawable(bitmap);
            imageView.getLayoutParams().width = bitmapWidth;
            imageView.getLayoutParams().height = bitmapHeight;
            count = 1;
            return;
        }
        else if(count==1){
            Resources res = getResources();
            bitmap = (BitmapDrawable) res.getDrawable(R.drawable.image01);
            int bitmapWidth = bitmap.getIntrinsicWidth();
            int bitmapHeight = bitmap.getIntrinsicHeight();

            imageView.setImageDrawable(bitmap);
            imageView.getLayoutParams().width = bitmapWidth;
            imageView.getLayoutParams().height = bitmapHeight;
            count = 0;
            return;
        }
    }

}
우선은 findViewById를 통해 스크롤뷰와 이미지뷰를 가져왔습니다. 프로젝트에 추가된 이미지들은 getDrawable메서드를 이용해 BitmapDrawable 객체로 만들어집니다. getDrawable 메서드는 Resources 객체에 정의되어있으며 액티비티에 정의된 getResources메서드를 이용하여 Resources 객체를 참조할 수 있습니다. BitmapDrawable 객체의 getIntrinsicWidth와 getIntrinsicHeight 메서드를 통해 원본 이미지의 가로, 세로 길이를 알 수 있고, 이 값들을 이미지뷰에 설정된 LayoutParams 객체의 width, height 속성으로 설정할 수 있습니다.
'앱 > 안드로이드' 카테고리의 다른 글
| 06 이벤트 처리 (1) | 2021.01.12 |
|---|---|
| 05 기본 위젯과 드로어블 (0) | 2021.01.11 |
| 03 Linear layout (0) | 2021.01.07 |
| 02 뷰와 레이아웃 (3) | 2021.01.06 |
| 01 안드로이드 앱 실행하기 (0) | 2021.01.05 |


