
이것저것
03 Linear layout 본문
안드로이드에서 제공하는 레이아웃은 다음과 같습니다.
- 제약 레이아웃
- 리니어 레이아웃
- 상대 레이아웃
- 프레임 레이아웃
- 테이블 레이아웃
이번에는 리니어 레이아웃을 다뤄보도록 하겠습니다.
리니어 레이아웃은 박스 모델로, 한 쪽 방향으로 차례대로 뷰를 추가하며 화면을 구성하는 방법입니다.
뷰를 생성하면 뷰가 차지할 수 있는 사각형 영역을 할당합니다.
뷰가 레이아웃에 추가되면 다음과 같은 형태로 생성됩니다.
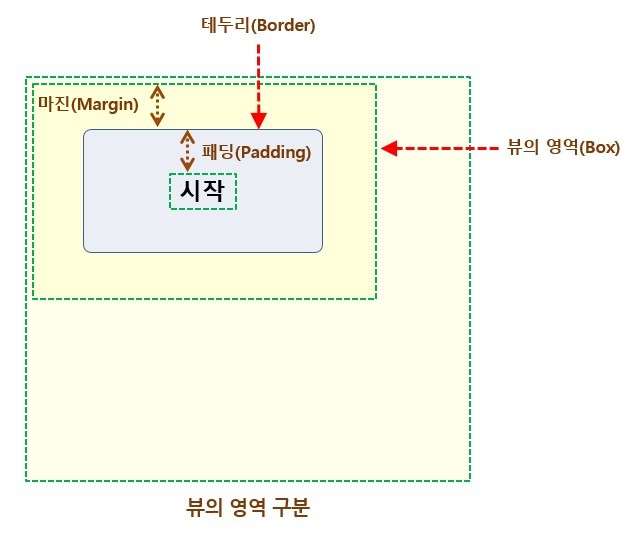
사진을 보면 테두리 바깥 공간을 마진, 안쪽 공간을 패딩이라고 합니다.
라이니어 레이아웃은 orientation 속성을 필수로 지정해야됩니다. 속성 값으로는 vertical, horizontal을 가집니다.
vertical로 설정하면 뷰가 세로로 추가되고, horizontal로 설정하면 뷰가 가로로 추가됩니다.
레이아웃을 라이니어로 지정하고, 3개의 버튼을 가로로 배열하면 다음과 같습니다.
<?xml version="1.0" encoding="utf-8"?>
<LinearLayout xmlns:android="http://schemas.android.com/apk/res/android"
    xmlns:app="http://schemas.android.com/apk/res-auto"
    xmlns:tools="http://schemas.android.com/tools"
    android:layout_width="match_parent"
    android:layout_height="match_parent"
    android:orientation="horizontal"
    tools:context=".MainActivity">

    <Button
        android:id="@+id/button"
        android:layout_width="wrap_content"
        android:layout_height="wrap_content"
        android:text="Button" />

    <Button
        android:id="@+id/button2"
        android:layout_width="wrap_content"
        android:layout_height="wrap_content"
        android:text="Button" />

    <Button
        android:id="@+id/button3"
        android:layout_width="wrap_content"
        android:layout_height="wrap_content"
        android:text="Button" />
</LinearLayout>

원래는 레이아웃 소스 코드와 자바 소스 코드는 서로 분리되어 있어 화면 구성을 바꿀 때는 xml 코드만 바꾸면 됩니다. 하지만 레이아웃을 미리 만들 수 없거나, 필요할 때마다 바로바로 레이아웃을 만들어야 한느 경우, 자바 소스 코드에서 화면 레이아웃을 구성할 수 있습니다.
package org.techtown.samplelinearlayout;

import android.os.Bundle;
import android.widget.Button;
import android.widget.LinearLayout;

import androidx.appcompat.app.AppCompatActivity;

public class LayoutCodeActivity extends AppCompatActivity {

    @Override
    protected void onCreate(Bundle savedInstanceState) {
        super.onCreate(savedInstanceState);

        LinearLayout mainLayout = new LinearLayout(this);
        mainLayout.setOrientation(LinearLayout.VERTICAL);

        LinearLayout.LayoutParams params = new LinearLayout.LayoutParams(
                LinearLayout.LayoutParams.MATCH_PARENT,
                LinearLayout.LayoutParams.WRAP_CONTENT
        );

        Button button1 = new Button(this);
        button1.setText("Button1");
        button1.setLayoutParams(params);
        mainLayout.addView(button1);

        setContentView(mainLayout);
    }
}
위 코드를 보시면 setContentView메서드 안에 파라미터를 R.layout.activity_main이 아니라 레이아웃 객체를 전달하였습니다. 레이아웃 객체를 만든 후, setOrientation을 통해 방향을 설정하고, 레이아웃 안에 들어갈 뷰들에 대한 설정을 LayoutParams를 통해 설정해 줍니다. 그 후 뷰를 만들고 뷰에 param을 설정하고 레이아웃에 추가하면 됩니다.
뷰를 정렬하는 방법은 2가지가 있습니다.
layout_gravity속성과, gravity 속성을 설정하면 됩니다. 여기서 각 속성에 따라 정렬하는 대상이 달라집니다.
우선 layout_gravity 속성부터 보겠습니다.
라이니어가 vertical로 설정되어있다고 가정하고 button들이 가로, 세로 둘다 wrap_content로 설정되면 각 줄에 하나의 버튼이 크기만큼만 만들어지고 오른쪽에 여유공간들이 생기게됩니다. 이때 layout_gravity속성을 이용해 여유공간 상에서 뷰의 위치를 left, center, right 등의 값을 통해 정렬할 수 있습니다.
layout_gravity가 뷰의 위치를 결정하는 속성이라면, gravity 속성은 뷰의 위치가 아닌, 뷰의 내용물의 위치를 결정하는 것입니다.
layout_gravity, gravity의 정렬 결과는 다음과 같습니다.
<?xml version="1.0" encoding="utf-8"?>
<LinearLayout xmlns:android="http://schemas.android.com/apk/res/android"
    android:orientation="vertical"
    android:layout_width="match_parent"
    android:layout_height="match_parent">


    <Button
        android:id="@+id/button4"
        android:layout_width="wrap_content"
        android:layout_height="wrap_content"
        android:layout_gravity="left"
        android:text="Button" />

    <Button
        android:id="@+id/button5"
        android:layout_width="wrap_content"
        android:layout_height="wrap_content"
        android:layout_gravity="center"
        android:text="Button" />

    <Button
        android:id="@+id/button6"
        android:layout_width="wrap_content"
        android:layout_height="wrap_content"
        android:layout_gravity="right"
        android:text="Button" />

    <TextView
        android:id="@+id/textView"
        android:layout_height="wrap_content"
        android:layout_width="match_parent"
        android:text="left"
        android:gravity="left"
        android:textColor="#ffff0000"
        android:textSize="32sp" />
    <TextView
        android:id="@+id/textView2"
        android:layout_height="wrap_content"
        android:layout_width="match_parent"
        android:text="right"
        android:gravity="right"
        android:textColor="#ffff0000"
        android:textSize="32sp" />

    <TextView
        android:id="@+id/textView3"
        android:layout_height="match_parent"
        android:layout_width="match_parent"
        android:text="center"
        android:gravity="center_horizontal|center_vertical"
        android:textColor="#ffff0000"
        android:textSize="32sp" />
</LinearLayout>
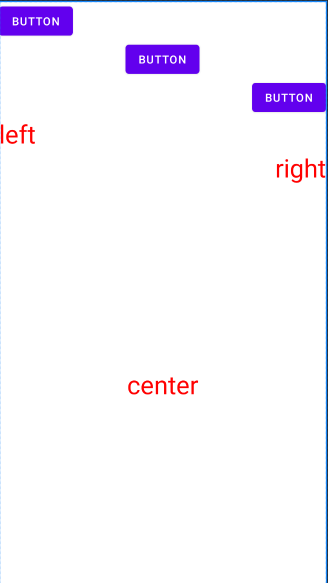
처음 버튼 3개는 각각 wrap_content로 설정되어 있어 각 줄에 여유 공간이 존재합니다. 여기에 layout_gravity속성에 각각 left, center, right값을 주면 위와 같은 결과가 나옵니다.
TextView는 left, right의 경우는 width를 match_parent로 설정해서 여유공간을 만들었습니다. 뷰 내부의 여유 공간에서 글자들을 gravity에 left, right를 줘서 정렬했습니다.
center의 경우는 width와 height 둘다 match_parent속성을 줘서 뷰 내에 사각형 모양의 여유공간을 만들고, | 연산자를 이용해 가로방향으로 중앙, 세로 방향으로 중앙의 교집합인 중앙에 위치하도록 정렬하였습니다.
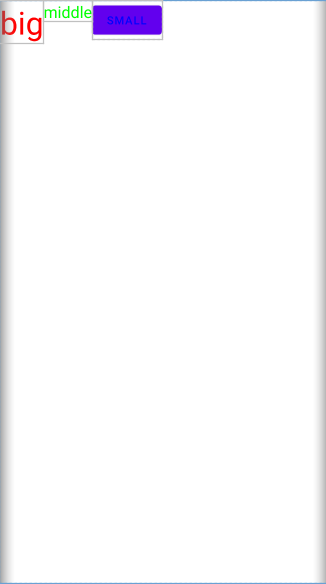
텍스트뷰로 화면을 구성하다보면 텍스트가 옆의 텍스트뷰나 버튼에 들어 있는 텍스트의 높이와 맞지 않는 경우가 종종 있습니다. 이런 경우에는 layout_gravity, gravity가 아닌, baselineAligned속성을 통해 해결할 수 있습니다.
값이 true면 높이가 맞춰지고, false면 높이가 달라집니다.

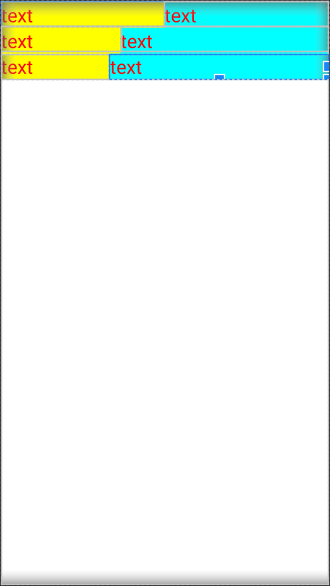
부모 컨테이너에 추가한 뷰들의 공간을 제외한 여유 공간은 layout_weight 속성으로 분할할 수 있습니다.
layout_weight를 각각 1, 2로 주면 여유 공간을 1대 2로 분할하겠다는 뜻이고, 1, 1로 주면 1대1로 분할하겠다는 의미가 됩니다.
LinearLayout 안에 여러개의 LinearLayout을 만들어 각 줄에 분할 결과를 나타내면 다음과 같습니다.
<?xml version="1.0" encoding="utf-8"?>
<LinearLayout xmlns:android="http://schemas.android.com/apk/res/android"
    android:orientation="vertical" android:layout_width="match_parent"
    android:layout_height="match_parent">

    <LinearLayout
        android:layout_width="match_parent"
        android:layout_height="wrap_content"
        android:orientation="horizontal"
        >
        <TextView
            android:layout_width="wrap_content"
            android:layout_height="wrap_content"
            android:background="#ffffff00"
            android:text="text"
            android:textColor="#ffff0000"
            android:textSize="24dp"
            android:layout_weight="1"
        />
        <TextView
            android:layout_width="wrap_content"
            android:layout_height="wrap_content"
            android:background="#ff00ffff"
            android:text="text"
            android:textColor="#ffff0000"
            android:textSize="24dp"
            android:layout_weight="1"
            />
    </LinearLayout>
    <LinearLayout
        android:layout_width="match_parent"
        android:layout_height="wrap_content"
        android:orientation="horizontal"
        >
        <TextView
            android:layout_width="wrap_content"
            android:layout_height="wrap_content"
            android:background="#ffffff00"
            android:text="text"
            android:textColor="#ffff0000"
            android:textSize="24dp"
            android:layout_weight="1"
            />
        <TextView
            android:layout_width="wrap_content"
            android:layout_height="wrap_content"
            android:background="#ff00ffff"
            android:text="text"
            android:textColor="#ffff0000"
            android:textSize="24dp"
            android:layout_weight="2"
            />
    </LinearLayout>
    <LinearLayout
        android:layout_width="match_parent"
        android:layout_height="wrap_content"
        android:orientation="horizontal"
        >
        <TextView
            android:layout_width="0dp"
            android:layout_height="wrap_content"
            android:background="#ffffff00"
            android:text="text"
            android:textColor="#ffff0000"
            android:textSize="24dp"
            android:layout_weight="1"
            />
        <TextView
            android:layout_width="0dp"
            android:layout_height="wrap_content"
            android:background="#ff00ffff"
            android:text="text"
            android:textColor="#ffff0000"
            android:textSize="24dp"
            android:layout_weight="2"
            />
    </LinearLayout>
</LinearLayout>
위 코드를 설명하면 다음과 같습니다.
최상위 레이아웃은 vertical로 설정하고, 하위 레이아웃들은 각각 horizontal로 설정합니다. 그리고 각 layout 안에 textView를 2개씩 넣습니다.
첫 줄은 여유 공간을 1대 1로, 두번째는 여유공간을 1대 2로, 세번째는 전체 줄을 1대 2로 분할한 결과입니다.
이때 부모 레이아웃의 가로 길이를 1대 2로 분할하느 경우에는 textView의 width 값에 0dp를 줘야합니다.
'앱 > 안드로이드' 카테고리의 다른 글
| 06 이벤트 처리 (1) | 2021.01.12 |
|---|---|
| 05 기본 위젯과 드로어블 (0) | 2021.01.11 |
| 04 상대 레이아웃, 테이블 레이아웃, 프레임 레이아웃, 스크롤 뷰 (1) | 2021.01.08 |
| 02 뷰와 레이아웃 (3) | 2021.01.06 |
| 01 안드로이드 앱 실행하기 (0) | 2021.01.05 |


